Monday, September 19, 2011

It Clicks, It Pops.

Ever since I've had my Acer Revo it's been irritating me because it pops and clicks at a low but disconcerting volume through the TV I have it connected to. It would stop popping and clicking if I disconnected one of the two stereo channels*; diagnosis therefore is one of those elusive and always poorly explained  "earth loops"

So, I let that annoy me for over 6 months then splashed out £4 for a ground loop isolator from ebay:

Nothing says "High Quality" like a poorly applied black on gold label

Otherwise known as an audio transformer it's a 1:1 er, transformer which, er, isolates the earth between bits of kit thus breaking any of those earth loops.

Staggeringly, it works.

 --------------------------------------------------------

* I don't have it connected up with the HDMI 5 channel sound because:
  1.   I don't have any other 5 channel gear to connect it to
  2. Ubuntu.


Friday, September 2, 2011

Sunday, August 7, 2011

Unscheduled Maintenance

Driving along yesterday in a mild summer deluge I couldn't help but notice that the wipers on my SLK were less "intermittent - slow - fast" as "occasional - weary - stopped". I expected my bank balance, personal safety or chances of getting the mid-afternoon snooze all to be at risk.

Having an eye for broken windscreen wipers my diagnosis was that the linkage was seized. The Internet says a new one is more than £100 so I'll obviously be taking the old one to bits in lieu of having anything better to do.
  1. Remove both wipers; under the plastic caps on the tops of the spindles are nuts and then a bit of wriggling to get the wipers themselves off the tapered shafts.
  2. Remove the plastic bulkhead shield - half a dozen self tapping torx screws then a bit of pulling. The washer jets are attached to this so just plonked on top of the engine so I didn't need to disconnect them
  3. You can now see the wiper mechanism; I removed the nut which connects the linkage onto the motor (after marking it's position with tippex so I knew where to put it back...) and the motor was able to whizz around quite freely on it's own. Also I tried to move the linkage by hand and it was going nowhere - Diagnosis correct!
  4. There's three bolts holding the wiper mechanism to the car - one above each wiper spindle and one on the bulkhead. Because the linkage was jammed in an odd position I had to also detach the motor to get it out (three more bolts in the middle of the big metal plate on the linkage.
Once I had the linkage out it became obvious it was seized as balls. I put it in the vice to work it back and forward with a big lever and all the penetrating fluid which freed up a little but it was never going to be right. Also I couldn't tell if one or both of the two spindles was seized. It needs to come to bits.

Can you take the sodding thing apart? Unbelievably, you can. Each of the spindles sits in a housing like this:

I am good drawer.

It's a simple case of pushing off the circlip (which is actually very easy). I did the driver's side one first and the spindle fell out of the housing with only a slight bash with a hammer. That one's ok then. Then I tried the passenger side (centre) one and, well, that was stuck.

After several rounds of violence and bad language I managed to get it out. It dragged one of the bearings out of the housing with it.

My theory about what's gone wrong here - the depression that the o-ring sits in was full of aluminium corrosion. That had forced the o-ring against the spindle and it had worn away (it was more "D" shaped than "O" shaped). Water got in and sat in the void between the two bearings and that filled with steel/aluminium corrosion. My guess is that this isn't so bad until it dries out and since there's now no water to lubricate it, it suddenly seizes.
Here you can see the spindle complete with the (plain, brass?) bearing that got pulled out of the housing. In the middle you can see where I've cleaned up the big glob of corrosion. To the left is the actuating arm and to the right is the groove for the circlip.

Anyway, all the bits were cleaned up, lubricated and re-assembled (including pressing the bearing back in) and... everything worked perfectly - better than ever in fact. I didn't have a replacement o-ring so I reassembled it with the old, tired one, however I can change that with  the linkage still on the car next time I have cause to be ferkling around in there.

Total time taken - about two hours plus procrastination.

Now, stop raining and breaking.


Monday, July 25, 2011

I've Started so I'll Eventually Finish

What is quite literally a lifetime ago I took the bash guard of the KLR650 with the the intention of touching up it's rusty bits and also those of frame tube behind it where the front wheel chucks a load of rocks and muck straight onto them . That was a divorce, a house move, several jobs and quite a few years ago and somehow amongst that it never got finished.

One problem was finding some matching paint. There's no point asking on the internet for a paint code because you get 3 different answers, none of which sound promising and none of which you can actually obtain anywhere. So, I took a rare sunny day off and drove down to Halfords clutching said bash guard in my mitt for comparative purposes and £6.49 later I was the owner of this:

Off-the-Shelf Vauxhall Platinum - Eerily Oriental

This is a very yellow silver metallic colour which to my utter incredulation is a perfect match for the frame paint on the KLR650.

 Here's the bash guard with several blended in repairs on it. It's not a great photo but the match really is excellent.


Previously much more brown.
Also I must congratulate Halfords on upping the quality of their aerosol paint as it now appears to actually contain some pigments and solids and applies well. It's no longer reminiscent of trying to apply spiitty poo to a vertical surface, something which we have all no doubt attempted. 

One less job on the list, I'm now wondering how good a match I can get for "Kawasaki Engine Bronze".

Tuesday, June 28, 2011

Spanners in the Post.

The modern world is not rubbish. You can come home from work and find a spanner has been delivered to your doorstep. That wouldn't happen in the 80's.
Tomato for scale. It's a quite large cherry tomato.


The reason I need this spanner is despite earlier optimism, the "Check Engine" light on my R170 Mercedes SLK keeps coming on, showing error P0410 on the scanner. And none of my existing spanners will do. And who doesn't like more spanners?
Stop Doing that.
After extensive research (i.e. Google) it would appear I need one of these:
Part Number A0021406860. Or £50 as it is more commonly known.
The generic description of the P0410 error is something like "Air pump or associated wiring failed". It's to do with the part of the emissions system which pumps air into the exhaust for some reason. Only my car doesn't have an electric air pump - instead it uses the supercharger and a series of valves of which this is just one. 


So all I need to do is unbolt the old one and and bolt this one in.


Yes, that's how it works.

Regrettably. the old one is here:

Yes that's right - you can barely see it. It's between the back of the engine and the bulkhead nestling in a bundle of tubes and wires. Follow the rubber hose up from the bottom left. The other side of it is threaded into a metal pipe.

I've taken off all the fancy engine covers to reveal it - they are removed by the "pulling very hard" method.


So:
  1. You can't actually get a spanner on it because the bolt hex part is too thin for a normal spanner.
  2. If you could get a spanner on it, you can't turn it because there is no clearance
  3. It's ultimately attached to the exhaust so it's virtually welded on with grot and heat.
Splendid.

First attempt I tried making tools out of bits of scrap metal:
I am skilled toolmaker

These variously bent, twisted off and ruined my knuckles.

Next I decided to remove the long pipe the valve is screwed into which snakes around the engine and opens into the exhaust manifold, then I could get it onto the bench. In my previous attempts with the home-made tools this was flexing alarmingly and I don't even want to know how much a new one costs.

I am replacing part 250.


The pipe (200) attaches to the manifold with this funky bolt (230) that you can't even seen - I needed my new 27mm spanner and sixth sense to get it off.

Removed (and replaced) using ESP. Don't loose the two malleable washers.

Annoyingly, once I removed that and the additional two bolts (210, 220) that hold the pipe in place, it was still jammed in. I managed to rotate it enough I could get at it though:

Yes, so very much more accessible.
The dirty great pipe spanner was used to hold the pipe (oddly enough - I do like to use the right tool for the job) in an effort to stop twisting the fitting off the end and also to help stop bending it; a serious amount of force was required to get the valve off. That was partially successful in that it only bent a bit making it just a slight mare to get back into place.

The hose clamp (270) isn't re-usable so was cut off and my Mercedes now sports a beautifully made clamp rescued from a 1970s Alfa Romeo. I think the clamp is the only bit of that car that didn't turn to dust.

The valve itself is a one-way valve - I could easily blow through the new one in one direction but the old one was blocked both ways - definitely broke and most likely the problem. When I went into the immaculately presented parts desk at the Mercedes dealer the lady there didn't even need to go look for it - she had a box full of them under the counter. Not an uncommon problem, perhaps. The fault has been reset again so hopefully that will be the end of it. 

That's a good 3 hour job by the time you are finished messing about. My hands may take longer to mend.


Tuesday, June 14, 2011

Life is much improved

Using only:
  • Two barrel tabs from ebay
  • A parts organiser box from a budget outlet
  • A hole saw, a soldering iron and a glue gun
I made this:
Yes, I know, it is awesome.


Question:  what the hell is that?
Answer: You fill half of it with washing liquid and the other half with conditioner and you put it here:

I have no idea where the knob is.


You can save literally seconds of your life every time you put a wash on!

Monday, May 23, 2011

Lacking Adhesive Qualities..

This best of breed item is one of a set of cable clips I bought from Poundland (yes, for a pound) less than a year ago.
At least it didn't snap.
It's attached to whatever by one of those tenacious foam sticky pads. You know, the type - if you want rid of it you have to painfully saw it up using a bit of dental floss, scape as much of the remains off as possible with a razor blade and then douse in intoxicating solvent. All very dangerous and not dissimilar to my ex wife. Anyway, these clips have, to a man, dropped off of their own accord with the foam and glue turning to a toxic looking dust like substance. 

DAMN YOU POUNDLAND MY CABLES ARE AWRY.

Thursday, May 19, 2011

Teaching Dogs Tricks

Or, more hard work involving Ubuntu, LIRC, XBMC and my Revo 3700. The dog in question specifically being  my cheap tat probably fake USB IR receiver - the "Fintek  F71610A or F71612A" aka "HP P/N 5187-4593" aka "Model OVU400102/71". This came supplied with a matching MCE remote, but seen as I've already wasted far too long making that one work, I thought why not waste additional precious life and make it work with via my existing TV remote as well?

Step 1a: Go look for an existing remote configuration file.

A full set can be found at the LIRC website and a reduced set in  /user/share/lirc.

Of course my TV is a no-name ("Technika")  item I got from Tesco so impossible to tell if the remote is already supported, because I have no idea what it is because it has no label. This will clearly take longer than it should.

Step 1b: Capture some output from the remote
Open this existing XBMC configuration file in file in an editor:
user/share/xbmc/system/lircmap.xml
Find in that file a section that starts a bit like this:
    <remote device="linux-input-layer">
    <altname>cx23885_remote</altname>
    <altname>devinput</altname>
        <left>KEY_LEFT</left>
        <right>KEY_RIGHT</right>
What you are interested in are two things:
  1. Tthe semi-meaningful names for remote buttons, (e.g. "KEY_LEFT", KEY_RIGHT") that are understood by XBMC  etc.
  2. The names of the remotes that XBMC understands (e.g. "devinput")

In a terminal execute:
sudo irrecord -d /dev/lirc0 lircd.conf.tmp 
 And follow the instructions. There's three phases:
  1. Mash buttons on your remote. Dots (80 of them) get printed as long as a button is pressed
  2. Mash more buttons on your remote. Dots (80 of them) get printed once per press
  3. Type in a name of a button (e.g. "KEY_LEFT" - see handy list you made previously) -  then press that button on your remote and it will be captured.
At the end of this, you'll end up with a file called lircd.conf.tmp which will contain the captured remote data.

Edit this file  to give your remote a name that XBMC will understand, i.e. find the line:

 name lircd.conf.tmp
and change it to
  name devinput

The captured data was in "raw" mode, we will analyse the data into something moire meaningful and at the same time copy the data to somewhere more appropriate. Change "technika" to something more appropriate for what you have.

$ sudo mkdir /usr/share/lirc/remotes/technika
$ sudo -s 'irrecord -a lircd.conf.tmp > /usr/share/lirc/remotes/technika/lircd.conf.technika'


Step 2:Check if the remote is indeed supported
I'm not sure how effectively I did this. What I did was:
  1. Download the supported remote list archive from LIRC
  2. Mounted the archive in Nautilus
  3. grep'ed the archive with one of the codes I'd captured in the previous step.
The result was - It took forever and did not find a match. So, I'll call my remote currently  unsupported by LIRC.

Step 3: Let LIRC know about the new remote

Edit the configuration file at /etc/lirc. It should already have a line to include the "mceusb" remote, you need to add a second line to include the new one also

#Configuration for the Windows Media Center Transceivers/Remotes (all) remote:
include "/usr/share/lirc/remotes/mceusb/lircd.conf.mceusb"

#  tesco technika TV
include "/usr/share/lirc/remotes/technika/lircd.conf.technika"

And then re-start LIRC so it picks up the new configuration:

$ sudo /etc/init.d/lirc restart

You can test it works in a terminal using:

$ irw 

And pressing some buttons on the remote, you shoukd see their assigned names appear in the terminal. CTRL-C on the keyboard stops irw.
Step 4: There is no Step 4.
You should be now able to start up XBMC and your operate it with the new remote. 
Note that there is a number of possible ways to do this, using different naming conventions - you could for example give your remote a more meaningful name than "devinput" but I've chosen this method because it's the simplest way to add a single remote that involves the least number of files you need to maintain. This helps when trying to move or update XBMC. 
Another several hours of my life spent reading incomprehensible manuals and editing text files. Lucky it's so much fun.

Tuesday, May 17, 2011

More Cheap Tat.

Continuing my dual pursuits to do things on the cheap with respect to a remote control for my XBMC whilst simultaneously destroying the planet by having the entire contents of e-bay shipped to me in individual packets from the other side of said planet, I received a new remote kit in the post today.

This is a replacement for the old kit which was slightly more broken than I would have liked. To my surprise and his credit the vendor sent me a replacement without even any fuss. Either excellent customer service or the more cynical side of me thinks the mark-up on these is enormous.

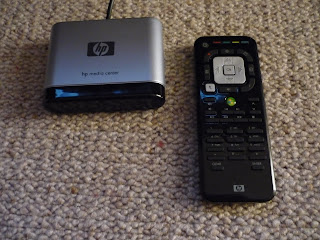
Interestingly, the new one appears to have additional features - fake HP stickers!
Left: Old and Busted. Right: New Goodness.

It still advertises itself on the USB bus as the "Fintek  F71610A or F71612A" but now claims externally to be HP P/N 5187-4593 or Model OVU400102/71 - it doesn't seem sure which.

I'm happy to say that both the remote and the receiver are free of the minor faults that were present in the last kit, and thanks to previous efforts worked straight away.

Fascinating Update:

The new reciever is functionally different to the old one as well! The Acer Revo that this is attached to is set to wake on a signal from the remote. On the old unit, any button on any remote (i.e. any IR activity anywhere) would cause a wake; this was mildly annoying. With the new unit, only the power button on the HP remote causes it to wake up. Life is slightly improved.

Tuesday, May 10, 2011

Cheap Thing in "Works Well" Shokka


U380. Surprisingly functional.

When I first bought my car (Quentin Wilson's "bargain of the year" - an R170 Mercedes SLK) it had a couple of very minor issues. Those being that it was full of water and  the expensive looking "Check Engine" light kept coming on. Diagnosis needed something slightly more sophisticated than what I have in my toolbox (bent screwdivers and dirt) so I took a punt and bought one of these U380 OBD scanners from a popular auction site for just over £20. This is the newer model that can read a CAN bus, my decade old car has no such thing and instead uses one of the older "ISO" protocols - the scanner is backwards compatible. In theory I could have bought the older, non-CAN model U280 scanner but it wasn't significantly cheaper.

So for the price of 10 seconds of a white suited Mercedes mechanic's time I was able to read and reset the fault code. That was some time ago and it's never come back so we will call it fixed.

It won't pick up all the codes the car can generate - for example if I want to read the roof control computer I'll need to re-wire the scanner "a bit". Kind of hoping I won't have to though.

Rust free car oxymoron

There's always some somewhere. Usually hiding behind something prominent.

Lucky I've spent all that time with Italian cars so I can fix it.

This is the only bit of "proper" rust I've found on my year 2000 SLK so far besides some untreated stone chips. I only noticed it because the paint was lifting and starting to push the badge off with it! Most of the damage will be hidden by the badge when it's replaced, the bit that sticks out will get some touch-up paint.

The badge is held on by two pins which go through little plastic plugs in the two holes you can see in the picture. To get it off I removed the bonnet catch from underneath which allowed me access to push directly on the pins to pop it off.

Monday, May 9, 2011

Spot the Difference

I have a very healthy income but cannot resist a bargain, a.k.a Poundland. This car washing brush, er, £1.
Spot the difference between the two photos (visual cue added by me)


I saw this and thought "it's a brush, I'll bet the tolerance on that ball valve isn't great but for a pound, who cares if it leaks a bit". I didn't expect it to make absolutely no difference whatsoever, though.

I only go in there for the banter really.

Friday, May 6, 2011

Tightwad + Ubuntu = Agony.

So I recently bought this to control my Ubuntu based XBMC for  a whole 18 US dollars off of that e-bay:
It says "HP" on it. Obviously Genuine

I plugged my tightwad remote into my tightwad computer which runs Ubuntu 10.10 and predictably it didn't work. Both because it's cheap junk and Ubuntu is designed to test the most patient amongst us. I blame myself for all of this, you know.

So, the not so obvious first step is to install LIRC, the Linux remote control software because it just is.
sudo apt-get install lirc
You will get a funky little text based installer asking you to choose what type of device you have. Instead of guessing, you want to choose "Windows Media Center Transceivers/Remotes (all)" for the  remote and "None" for the transmitter.

Did that work? Of course not.

Next thing is to do is find out what it really is in the box.
user@Revo:~$ lsusb
Bus 003 Device 004: ID 1934:5168 Feature Integration Technology Inc. (Fintek) F71610A or F71612A Consumer Infrared Receiver/Transceiver
Oh yes, the well known HP "Fintek" thingy. A bit of googling tells me that this is a generic part which is a single chip USB / IR solution. You need to add a tiny memory chip to it to get it to report another name (you know, like "HP" or "Microsoft"); something LIRC may recognise. Amusingly, the difference between the F71610A and the  F71612A is that one is a transceiver and the other a receiver only; except they are the same part and you enable the additional functionality by adding a resistor.

The problem then is not all Linux - these knock-off devices are being put on the market without the proper identification because it saves a few pennies. So, I may now know what it is but lamentably Ubuntu 10.10 does not have a scooby doo. How to fix this. Who can tell. Well, me after a bit (lot) of hunting around on the Internet.

The first problem is; this may be fixed in future versions of the Linux kernel, but it's not fixed in the kernel I have, and it's unlikely to be fixed as there's been a change in the way LIRC handles things. It used to be a "kernel extension" and now it's "in kernel". And of course it's much harder to change the new "in kernel" module. So we'll go back to doing it the old way.

First thing to do is blacklist the new kernel module so it won't load any more:
sudo sh -c 'echo "blacklist mceusb" > /etc/modprobe.d/blacklist-mce.conf'
That'll show it.
Next we need to add the Fentek device (ID 1934:5168) to the old kernel extension and that means <sigh> we need to re-compile it. Get the source code first:
sudo apt-get install lirc lirc-modules-source
Then you need to edit the file /usr/src/lirc-0.8.7~pre3/drivers/lirc_mceusb/lirc_mceusb.c adding the following lines into the big structure of similar entries:
/* Crappy Fintek based Chinese Remote */ {USB_DEVICE(VENDOR_FINTEK, 0x5168) },
Then do the actual build and install of the old style kernel module:
sudo dkms remove -m lirc -v 0.8.7~pre3 --all
sudo dkms add -m lirc -v 0.8.7~pre3
sudo dkms -m lirc -v 0.8.7~pre3 build
sudo dkms -m lirc -v 0.8.7~pre3 install
Hang on, we are getting there... And finally tell LIRC to load the old fashioned kernel extension instead of the new one; in file /etc/lirc/hardware.conf change the line:
REMOTE_MODULES="lirc_dev mceusb" 
to:
REMOTE_MODULES="lirc_dev lirc_mceusb"

You then need to restart and if you made no mistakes (hah!) it will work.

The final thing you need to do with this remote is to change the key mappings a bit, it has a single "Play/Pause" button where it looks like others have separate buttons. This means that within XBMC neither is detected.

I fixed this by modifying the file /usr/share/xbmc/system/lircmap.xml There is probably a better way of doing this by changing something in your user folder but I don't know what that is.
Two lines should be changed in the  <remote device="mceusb"> section. Before:

<play>Play</play>
<pause>Pause</pause>
and after:

<play>PlayPause</play>
<pause>PlayPause</pause>
Several wasted hours later it should work as you hoped!

Tuesday, April 26, 2011

Makework

I'd like to explain how my job works, using to medium of powerpoint.
Powerpoint - the dirty fuel of middle management
In the top left is a representation of my job. Surprisingly, I enjoy it. But I also understand that country music is, as usual, correct in stating that there must be a little rain to offset the sunshine and so that there is always some crap to deal with. It's not the worst crap in the world e.g. greasing up sumo wrestlers jockstraps; just usually some mindless low-level admin involving a 20 line spreadsheet that I'm too embarrassed to ask anyone else to do.


Then, one day, a man in a tie turns up. He has no discernible skills apart from the fact he once shared a bunk on a boat/yacht with one of the directors. He sees the crap bit of my job and unlike old negative me sees not a chore but an opportunity. So, he applies management school  "process improvement" to it, and by some magic that eludes me turns said insignificant crap into a full time job (top right). 

My mouth gapes in astonishment that:
  1. Such a trivial, monotonous task can be "improved" to such an extent.
  2. Mr. Tie man is even remotely interested in spending his day thus engaged.
Except of course, he's not remotely interested in spending his day doing this crap. Having created a great deal ultimately pointless entropy and fluff from absolutely nothing, he will then lobby the people who matter to employ additional resource to perform the newly important task. A new pleb appears. And because he's ever so clever Tie Man will be made the boss of both me and the new pleb.

Being da Boss is a full time job in itself, so now there's three people doing my main job plus the bit of crap I used to do while eating a sugary bun just after lunch. 

The final irony usually being that the pleb invariably has the work capacity of an incapacitated dead sloth and palms the now much enhanced crap back onto me.


Maybe I should get a tie.

Wednesday, April 20, 2011

Me Meme.

Everyone on the Internet like memes, and as I am both unoriginal and terrified of being excluded I too shall do a meme. It's also a little tribute to someone I used to live with.

It's not funny because it's true.

Everybody Talk About Shop Music.

When you get to a certain point in life (that being the point where you seem to waste a exponential proportion of your precious remaining hours trimming your eyebrows) it becomes impossible to find any new music you like. Normal people can possibly rely on adverts to find music with which to torture their dinner party guests but I usefully don't watch TV; that road is closed to me. Instead, my musical direction is dictated by retail outlets the likes of Next and H&M via the medium of Shazam. I am still in awe every time it works, it's like some sort of satanic electronic wizardry.

My latest discovery (thanks, Habitat) is a strangely named track from Sebastien Tellier:


Which reminds me very much of Jean Michele Jarre,  whom I was introduced to at university by a nice man called Ted back in the days when I had no taste in anything at all. Not like now. Mr Tellier appears to have released this track several years ago, which is of no pain to me because it's really as cutting edge as I can hope for and I look forward to hearing all this year's new music in 2020. Something about Mrs. Gaga, I'm told.


Kawasaki you tubes

Or, disabling the parking light function on my Kawasaki.

For not the first time in the last few years I rushed out in between torrents of refreshing rain for a quick go on my KLR650  only to find I was going nowhere due to the parking light feature-ette (If you turn the ignition key one click past "lock" it puts on the parking lights, which you can't see in the daytime but can pointlessly and pathetically illuminate the inside of your garage while voraciously draining every last bit of precious life from your battery)

I hate you.

Clearly what is required is tools and science. 


Here's the science:

Wiring. How does that work?

The Red/White (R/W) wire is the interesting one - follow it and it supplies power to the front and rear lights. According to the "Ignition Switch Connections" table, it gets this power either from the White wire (which comes more or less directly from the battery) in the "Park" position or the Red wire (this comes from the left hand switchgear light switch) which is powered only with the ignition on.

So the bad stuff comes from the white wire but I can't touch that because that kind of powers the whole bike. Instead, I need to cut the R//W wire where it comes away from the ignition switch so that it cannot be powered from that any more, then connect it directly to the Red wire so it can get power from there (it's important for the parking lights to work, I use them all the time :\ ).

Now to get the tools out...


Remarkably Rust-free.
First thing with any bike job is to remove some plastic bits. Luckily it's only the two screws on each side of the headlight cowl above - made much easier because I've replaced the ones made of cheese with decent fasteners.
Remarkably neat.

I expected the usual knot of fragile wires behind the cowl but instead found this very tidy row of connectors. The middle connector in this row of five is the one that features in the wiring diagram above. 
Remarkably easy. Photo does not show red/white wire hiding behind heatshrink.

Behind the dust boot are the expected wires. I did want to pull the pins with wires intact from the connector to make this somewhat reversible, but a few prods made it clear that this wasn't going to happen without something been broken and possibly blood loss. So I cut the two wires as shown then made a joint between them on the loom side with solder and heat shrink -- I would have preferred to use my fancy crimp tool but there was no chance of getting it into the available space.


tl:dr - Cut both the Red and Red/White wires, then join them together.


And that all works as planned - Sidelights now come on with the handlebar switch but not with the ignition key.