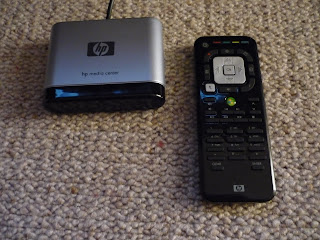
Or, more hard work involving Ubuntu, LIRC, XBMC and my Revo 3700. The dog in question specifically being my cheap tat probably fake USB IR receiver - the "Fintek F71610A or F71612A" aka "HP P/N 5187-4593" aka "Model OVU400102/71". This came supplied with a matching MCE remote, but seen as I've already wasted far too long making that one work, I thought why not waste additional precious life and make it work with via my existing TV remote as well?
Step 1a: Go look for an existing remote configuration file.
A full set can be found at the LIRC website and a reduced set in /user/share/lirc.
Of course my TV is a no-name ("Technika") item I got from Tesco so impossible to tell if the remote is already supported, because I have no idea what it is because it has no label. This will clearly take longer than it should.
Step 1b: Capture some output from the remote
Open this existing XBMC configuration file in file in an editor: user/share/xbmc/system/lircmap.xml
Find in that file a section that starts a bit like this:
<remote device="linux-input-layer">What you are interested in are two things:
<altname>cx23885_remote</altname>
<altname>devinput</altname>
<left>KEY_LEFT</left>
<right>KEY_RIGHT</right>
- Tthe semi-meaningful names for remote buttons, (e.g. "KEY_LEFT", KEY_RIGHT") that are understood by XBMC etc.
- The names of the remotes that XBMC understands (e.g. "devinput")
In a terminal execute:
sudo irrecord -d /dev/lirc0 lircd.conf.tmpAnd follow the instructions. There's three phases:
- Mash buttons on your remote. Dots (80 of them) get printed as long as a button is pressed
- Mash more buttons on your remote. Dots (80 of them) get printed once per press
- Type in a name of a button (e.g. "KEY_LEFT" - see handy list you made previously) - then press that button on your remote and it will be captured.
At the end of this, you'll end up with a file called lircd.conf.tmp which will contain the captured remote data.
Edit this file to give your remote a name that XBMC will understand, i.e. find the line:
The captured data was in "raw" mode, we will analyse the data into something moire meaningful and at the same time copy the data to somewhere more appropriate. Change "technika" to something more appropriate for what you have.
Step 2:Check if the remote is indeed supported
I'm not sure how effectively I did this. What I did was:
Step 3: Let LIRC know about the new remote
Edit the configuration file at /etc/lirc. It should already have a line to include the "mceusb" remote, you need to add a second line to include the new one also
And then re-start LIRC so it picks up the new configuration:
You can test it works in a terminal using:
And pressing some buttons on the remote, you shoukd see their assigned names appear in the terminal. CTRL-C on the keyboard stops irw.
Edit this file to give your remote a name that XBMC will understand, i.e. find the line:
name lircd.conf.tmp
and change it to name devinput
The captured data was in "raw" mode, we will analyse the data into something moire meaningful and at the same time copy the data to somewhere more appropriate. Change "technika" to something more appropriate for what you have.
$ sudo mkdir /usr/share/lirc/remotes/technika
$ sudo -s 'irrecord -a lircd.conf.tmp > /usr/share/lirc/remotes/technika/lircd.conf.technika'
Step 2:Check if the remote is indeed supported
I'm not sure how effectively I did this. What I did was:
- Download the supported remote list archive from LIRC
- Mounted the archive in Nautilus
- grep'ed the archive with one of the codes I'd captured in the previous step.
Step 3: Let LIRC know about the new remote
Edit the configuration file at /etc/lirc. It should already have a line to include the "mceusb" remote, you need to add a second line to include the new one also
#Configuration for the Windows Media Center Transceivers/Remotes (all) remote:
include "/usr/share/lirc/remotes/mceusb/lircd.conf.mceusb"
# tesco technika TV
include "/usr/share/lirc/remotes/technika/lircd.conf.technika"
And then re-start LIRC so it picks up the new configuration:
$ sudo /etc/init.d/lirc restart
You can test it works in a terminal using:
$ irw
And pressing some buttons on the remote, you shoukd see their assigned names appear in the terminal. CTRL-C on the keyboard stops irw.
Step 4: There is no Step 4.
You should be now able to start up XBMC and your operate it with the new remote.
Note that there is a number of possible ways to do this, using different naming conventions - you could for example give your remote a more meaningful name than "devinput" but I've chosen this method because it's the simplest way to add a single remote that involves the least number of files you need to maintain. This helps when trying to move or update XBMC.
Another several hours of my life spent reading incomprehensible manuals and editing text files. Lucky it's so much fun.