Monday, May 23, 2011

Lacking Adhesive Qualities..

This best of breed item is one of a set of cable clips I bought from Poundland (yes, for a pound) less than a year ago.
At least it didn't snap.
It's attached to whatever by one of those tenacious foam sticky pads. You know, the type - if you want rid of it you have to painfully saw it up using a bit of dental floss, scape as much of the remains off as possible with a razor blade and then douse in intoxicating solvent. All very dangerous and not dissimilar to my ex wife. Anyway, these clips have, to a man, dropped off of their own accord with the foam and glue turning to a toxic looking dust like substance. 

DAMN YOU POUNDLAND MY CABLES ARE AWRY.

Thursday, May 19, 2011

Teaching Dogs Tricks

Or, more hard work involving Ubuntu, LIRC, XBMC and my Revo 3700. The dog in question specifically being  my cheap tat probably fake USB IR receiver - the "Fintek  F71610A or F71612A" aka "HP P/N 5187-4593" aka "Model OVU400102/71". This came supplied with a matching MCE remote, but seen as I've already wasted far too long making that one work, I thought why not waste additional precious life and make it work with via my existing TV remote as well?

Step 1a: Go look for an existing remote configuration file.

A full set can be found at the LIRC website and a reduced set in  /user/share/lirc.

Of course my TV is a no-name ("Technika")  item I got from Tesco so impossible to tell if the remote is already supported, because I have no idea what it is because it has no label. This will clearly take longer than it should.

Step 1b: Capture some output from the remote
Open this existing XBMC configuration file in file in an editor:
user/share/xbmc/system/lircmap.xml
Find in that file a section that starts a bit like this:
    <remote device="linux-input-layer">
    <altname>cx23885_remote</altname>
    <altname>devinput</altname>
        <left>KEY_LEFT</left>
        <right>KEY_RIGHT</right>
What you are interested in are two things:
  1. Tthe semi-meaningful names for remote buttons, (e.g. "KEY_LEFT", KEY_RIGHT") that are understood by XBMC  etc.
  2. The names of the remotes that XBMC understands (e.g. "devinput")

In a terminal execute:
sudo irrecord -d /dev/lirc0 lircd.conf.tmp 
 And follow the instructions. There's three phases:
  1. Mash buttons on your remote. Dots (80 of them) get printed as long as a button is pressed
  2. Mash more buttons on your remote. Dots (80 of them) get printed once per press
  3. Type in a name of a button (e.g. "KEY_LEFT" - see handy list you made previously) -  then press that button on your remote and it will be captured.
At the end of this, you'll end up with a file called lircd.conf.tmp which will contain the captured remote data.

Edit this file  to give your remote a name that XBMC will understand, i.e. find the line:

 name lircd.conf.tmp
and change it to
  name devinput

The captured data was in "raw" mode, we will analyse the data into something moire meaningful and at the same time copy the data to somewhere more appropriate. Change "technika" to something more appropriate for what you have.

$ sudo mkdir /usr/share/lirc/remotes/technika
$ sudo -s 'irrecord -a lircd.conf.tmp > /usr/share/lirc/remotes/technika/lircd.conf.technika'


Step 2:Check if the remote is indeed supported
I'm not sure how effectively I did this. What I did was:
  1. Download the supported remote list archive from LIRC
  2. Mounted the archive in Nautilus
  3. grep'ed the archive with one of the codes I'd captured in the previous step.
The result was - It took forever and did not find a match. So, I'll call my remote currently  unsupported by LIRC.

Step 3: Let LIRC know about the new remote

Edit the configuration file at /etc/lirc. It should already have a line to include the "mceusb" remote, you need to add a second line to include the new one also

#Configuration for the Windows Media Center Transceivers/Remotes (all) remote:
include "/usr/share/lirc/remotes/mceusb/lircd.conf.mceusb"

#  tesco technika TV
include "/usr/share/lirc/remotes/technika/lircd.conf.technika"

And then re-start LIRC so it picks up the new configuration:

$ sudo /etc/init.d/lirc restart

You can test it works in a terminal using:

$ irw 

And pressing some buttons on the remote, you shoukd see their assigned names appear in the terminal. CTRL-C on the keyboard stops irw.
Step 4: There is no Step 4.
You should be now able to start up XBMC and your operate it with the new remote. 
Note that there is a number of possible ways to do this, using different naming conventions - you could for example give your remote a more meaningful name than "devinput" but I've chosen this method because it's the simplest way to add a single remote that involves the least number of files you need to maintain. This helps when trying to move or update XBMC. 
Another several hours of my life spent reading incomprehensible manuals and editing text files. Lucky it's so much fun.

Tuesday, May 17, 2011

More Cheap Tat.

Continuing my dual pursuits to do things on the cheap with respect to a remote control for my XBMC whilst simultaneously destroying the planet by having the entire contents of e-bay shipped to me in individual packets from the other side of said planet, I received a new remote kit in the post today.

This is a replacement for the old kit which was slightly more broken than I would have liked. To my surprise and his credit the vendor sent me a replacement without even any fuss. Either excellent customer service or the more cynical side of me thinks the mark-up on these is enormous.

Interestingly, the new one appears to have additional features - fake HP stickers!
Left: Old and Busted. Right: New Goodness.

It still advertises itself on the USB bus as the "Fintek  F71610A or F71612A" but now claims externally to be HP P/N 5187-4593 or Model OVU400102/71 - it doesn't seem sure which.

I'm happy to say that both the remote and the receiver are free of the minor faults that were present in the last kit, and thanks to previous efforts worked straight away.

Fascinating Update:

The new reciever is functionally different to the old one as well! The Acer Revo that this is attached to is set to wake on a signal from the remote. On the old unit, any button on any remote (i.e. any IR activity anywhere) would cause a wake; this was mildly annoying. With the new unit, only the power button on the HP remote causes it to wake up. Life is slightly improved.

Tuesday, May 10, 2011

Cheap Thing in "Works Well" Shokka


U380. Surprisingly functional.

When I first bought my car (Quentin Wilson's "bargain of the year" - an R170 Mercedes SLK) it had a couple of very minor issues. Those being that it was full of water and  the expensive looking "Check Engine" light kept coming on. Diagnosis needed something slightly more sophisticated than what I have in my toolbox (bent screwdivers and dirt) so I took a punt and bought one of these U380 OBD scanners from a popular auction site for just over £20. This is the newer model that can read a CAN bus, my decade old car has no such thing and instead uses one of the older "ISO" protocols - the scanner is backwards compatible. In theory I could have bought the older, non-CAN model U280 scanner but it wasn't significantly cheaper.

So for the price of 10 seconds of a white suited Mercedes mechanic's time I was able to read and reset the fault code. That was some time ago and it's never come back so we will call it fixed.

It won't pick up all the codes the car can generate - for example if I want to read the roof control computer I'll need to re-wire the scanner "a bit". Kind of hoping I won't have to though.

Rust free car oxymoron

There's always some somewhere. Usually hiding behind something prominent.

Lucky I've spent all that time with Italian cars so I can fix it.

This is the only bit of "proper" rust I've found on my year 2000 SLK so far besides some untreated stone chips. I only noticed it because the paint was lifting and starting to push the badge off with it! Most of the damage will be hidden by the badge when it's replaced, the bit that sticks out will get some touch-up paint.

The badge is held on by two pins which go through little plastic plugs in the two holes you can see in the picture. To get it off I removed the bonnet catch from underneath which allowed me access to push directly on the pins to pop it off.

Monday, May 9, 2011

Spot the Difference

I have a very healthy income but cannot resist a bargain, a.k.a Poundland. This car washing brush, er, £1.
Spot the difference between the two photos (visual cue added by me)


I saw this and thought "it's a brush, I'll bet the tolerance on that ball valve isn't great but for a pound, who cares if it leaks a bit". I didn't expect it to make absolutely no difference whatsoever, though.

I only go in there for the banter really.

Friday, May 6, 2011

Tightwad + Ubuntu = Agony.

So I recently bought this to control my Ubuntu based XBMC for  a whole 18 US dollars off of that e-bay:
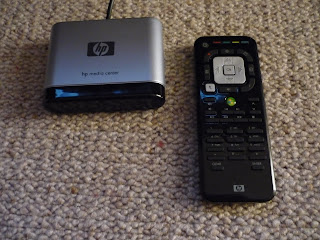
It says "HP" on it. Obviously Genuine

I plugged my tightwad remote into my tightwad computer which runs Ubuntu 10.10 and predictably it didn't work. Both because it's cheap junk and Ubuntu is designed to test the most patient amongst us. I blame myself for all of this, you know.

So, the not so obvious first step is to install LIRC, the Linux remote control software because it just is.
sudo apt-get install lirc
You will get a funky little text based installer asking you to choose what type of device you have. Instead of guessing, you want to choose "Windows Media Center Transceivers/Remotes (all)" for the  remote and "None" for the transmitter.

Did that work? Of course not.

Next thing is to do is find out what it really is in the box.
user@Revo:~$ lsusb
Bus 003 Device 004: ID 1934:5168 Feature Integration Technology Inc. (Fintek) F71610A or F71612A Consumer Infrared Receiver/Transceiver
Oh yes, the well known HP "Fintek" thingy. A bit of googling tells me that this is a generic part which is a single chip USB / IR solution. You need to add a tiny memory chip to it to get it to report another name (you know, like "HP" or "Microsoft"); something LIRC may recognise. Amusingly, the difference between the F71610A and the  F71612A is that one is a transceiver and the other a receiver only; except they are the same part and you enable the additional functionality by adding a resistor.

The problem then is not all Linux - these knock-off devices are being put on the market without the proper identification because it saves a few pennies. So, I may now know what it is but lamentably Ubuntu 10.10 does not have a scooby doo. How to fix this. Who can tell. Well, me after a bit (lot) of hunting around on the Internet.

The first problem is; this may be fixed in future versions of the Linux kernel, but it's not fixed in the kernel I have, and it's unlikely to be fixed as there's been a change in the way LIRC handles things. It used to be a "kernel extension" and now it's "in kernel". And of course it's much harder to change the new "in kernel" module. So we'll go back to doing it the old way.

First thing to do is blacklist the new kernel module so it won't load any more:
sudo sh -c 'echo "blacklist mceusb" > /etc/modprobe.d/blacklist-mce.conf'
That'll show it.
Next we need to add the Fentek device (ID 1934:5168) to the old kernel extension and that means <sigh> we need to re-compile it. Get the source code first:
sudo apt-get install lirc lirc-modules-source
Then you need to edit the file /usr/src/lirc-0.8.7~pre3/drivers/lirc_mceusb/lirc_mceusb.c adding the following lines into the big structure of similar entries:
/* Crappy Fintek based Chinese Remote */ {USB_DEVICE(VENDOR_FINTEK, 0x5168) },
Then do the actual build and install of the old style kernel module:
sudo dkms remove -m lirc -v 0.8.7~pre3 --all
sudo dkms add -m lirc -v 0.8.7~pre3
sudo dkms -m lirc -v 0.8.7~pre3 build
sudo dkms -m lirc -v 0.8.7~pre3 install
Hang on, we are getting there... And finally tell LIRC to load the old fashioned kernel extension instead of the new one; in file /etc/lirc/hardware.conf change the line:
REMOTE_MODULES="lirc_dev mceusb" 
to:
REMOTE_MODULES="lirc_dev lirc_mceusb"

You then need to restart and if you made no mistakes (hah!) it will work.

The final thing you need to do with this remote is to change the key mappings a bit, it has a single "Play/Pause" button where it looks like others have separate buttons. This means that within XBMC neither is detected.

I fixed this by modifying the file /usr/share/xbmc/system/lircmap.xml There is probably a better way of doing this by changing something in your user folder but I don't know what that is.
Two lines should be changed in the  <remote device="mceusb"> section. Before:

<play>Play</play>
<pause>Pause</pause>
and after:

<play>PlayPause</play>
<pause>PlayPause</pause>
Several wasted hours later it should work as you hoped!